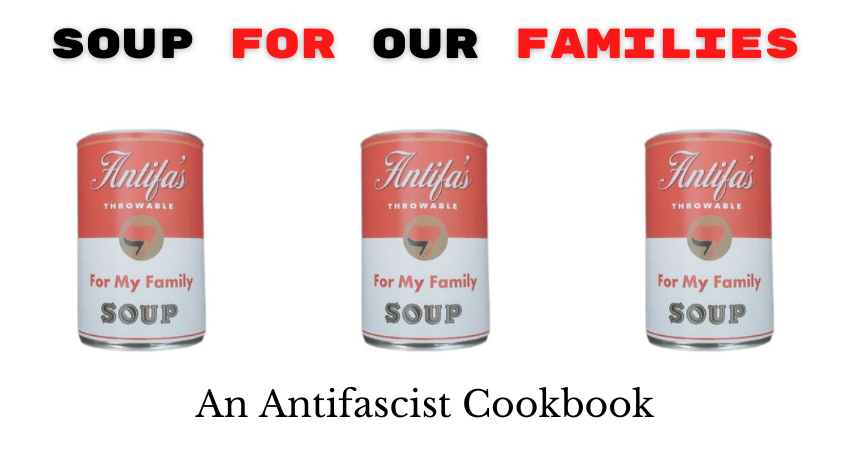
Read Soup For Our Families: An Antifascist Cookbook
- Download reading version (.pdf, formatted for screen reading)
- Download printer-friendly version (Print double-sided, using short-edge duplex)
Soup For Our Families: An Antifascist Cookbook Zine, First Published November 26, 2021. See licensing and re-use information at the end.

Table of Contents
- Introduction by Kit O’Connell
- Cocktails & Mocktails
- Appetizers & Sides
- “The Cornbread Poem” by Saisons
- Sauces & Seasonings
- “Stone Soup for My Family” by Drew T
- Soups
- “Swedish-Jewish Southern Soul Food” by Eleanor Goldfield
- Entrees
- “Street Forum Solidarity Tacos”
- Desserts
- “TeamCum Tart” by MILF ‘N’ Cookies
- About this Zine
Introduction
In late summer 2021, there seemed to be a brief window in the Pandemic where I felt safe organizing in-person events. Those of us among the vaccinated-and-careful cautiously emerged from our homes and met on sunny patios. We thought about ways to safely resume parts of our lives we’d put on hold.
With some Austin comrades, I began planning a potluck picnic to help bring the antifascist Left closer together. Then the Delta variant slammed into the American South and all our plans shut down again. Out of work and feeling cut off, I’ve struggled for some sense of purpose ever since.
So I decided to transform our picnic into a zine. I’d create an antifascist cookbook.
At first glance, a cookbook doesn’t seem any more antifascist than a picnic. But I believe the act of sharing food is inherently radicalizing. By this, I mean that it encourages us to see each other in radical new ways, through partaking in the most primal human act of all: sharing what we have with each other.
The radical nature of sharing food seems most obvious after a natural disaster or other disruption to the capitalist status quo. Rather than the mass panic depicted in movies, disasters tend to lead to mass spontaneous organization. Shared kitchens and food are often among the first infrastructure created after an earthquake, a flood, and other cataclysms.
Many of my comrades reacted to the Pandemic by doing their best to help the most vulnerable stay fed, clothed, and housed during an ongoing and worsening crisis. However, both the physical and political landscapes present new challenges to organizing. As we face both a rapidly destabilizing climate and a simultaneous rise of right-wing political power, it’s not likely things will get easier anytime soon.
How does a cookbook solve any of that? It doesn’t, I don’t think. The above is just what’s bouncing around in my head as I edit a zine during what often seems like apocalyptic times.
In some ways, I’m creating this cookbook as a distraction, to keep myself from thinking too much about this current moment. Yet I can’t help but imagine there will be times coming where we reach towards each other, look for a way to connect, and find that sharing food is the simplest, most direct way to begin.
About the recipes
What follows is a collection of recipes of all kinds, submitted by antifascists that work in many ways. There’s journalists and podcasters, community organizers and researchers into white supremacy, and people who fit all these categories and none.
The recipes in Soup For Our Families are vegetarian and omnivorous, from a variety of cuisines, and include cocktails, family recipes, tacos meant to serve dozens, sandwiches for 100, and more. There’s desserts, appetizers, and a lot of love. Love shared between comrades, love passed down through tradition, and love for our fellow humans, all of whom need to eat.
I hope this zine reflects the diversity of who we are, what we do, and the kinds of foods we love to eat. When I put out the call for recipes, some of the radical chefs that responded put their own creative spin on the assignment. I tried to take a light touch while editing this zine, so that each recipe carries something of the creator’s personality in it.
In the end, if Soup For Our Families is just a distraction, I hope it’s one you enjoy. Perhaps it inspires you towards some small act that builds into something more.
I believe something powerful and important starts with filling hungry bellies.
Kit O’Connell
August 29, 2021
Addendum, November 2021
The Pandemic waxed and waned as I worked on this zine over the course of the last few months.
What hasn’t changed is a sense of impending doom, of very bad weather coming, that so many of us feel. White supremacists are getting bolder, linking up with new groups, and forcing us to adapt to new tactics. A lot of us feel under- organized and overwhelmed.
When you’re faced with an existential crisis, find meaningful, concrete tasks and focus on them. Whether that’s a cookbook, or organizing your comrades for self-defense, pick something you can do and do it.

Cocktails & Mocktails
The Suffering Bastard
by DFW Anti-Fascist League
This cocktail has its roots in antifascist activism of the 1940s.
1 ounce bourbon of choice
1 ounce gin of choice
1 ounce fresh lime juice
1 dash Angostura bitters
4 ounces chilled ginger ale or ginger beer of choice
- Pour ingredients into an ice-filled Old Fashioned glass and top with ginger ale, adding more ice if desired.
- Garnish with a sprig of mint or an orange slice.
Bella Ciao
by Bones
1/4 ounce Toschi or Luxardo Cherry Syrup
3/4 ounce simple syrup
3/4 ounce lemon juice
Blood orange soda or Aranciata to top
- Build drink in tall glass.
- Add syrups and lemon, ice, top with soda and stir.
- Garnish with lemon peel and a cherry.
- Drink to Audisio*.
Note: Toschi or Luxardo cherries are a jarred cherry, it’s merely a branding. The syrup is rich and super flavorful without being cloying or Robitussin-y.
Also, when pouring the soda, pour through the ice, not directly into it. This will save carbonation and not flatten it. Stir gently but vigorously enough to incorporate the syrups and soda.
*Audisio is the partisan who found Mussolini trying to escape Switzerland and claims to be the one that shot him.

Appetizers & Sides
Gluten-free Skillet Cornbread
by Polycultured Life
1 3/4 cups cornmeal
1/4 cup almond flour
1/2 teaspoon sea salt
1 Tablespoon baking powder
1/4 cup unsalted butter softened
1 egg
1 cup buttermilk
1/4 cup sugar
- Preheat oven to 425 degrees.
- In medium bowl add cornmeal, almond flour, salt, sugar, and sift in baking powder.
- Mix dry ingredients.
- In another bowl whip egg, butter, and buttermilk until combined.
- Add wet ingredients to dry.
- Stir until it’s all mixed well, being careful not to over mix!
- Allow mixture to hydrate for 2-5 minutes.
- Grease and dust skillet with sugar.
- Add mixture to a 9 inch cast iron skillet.
- Bake for 20 minutes.
- If you choose, once in the skillet you can top the cornbread mixture with your favorite herbs or sprinkle some sugar on top for sweet crunch.
Mushroom Paté
by Tricia C.
This mushroom pate is the perfect appetizer for the champagne socialist. It is naturally gluten free and low carb.
1 pound mushrooms, whatever is cheap at the store. Baby Bella and white button mushrooms are ideal
1/4 cup onions or shallots
6 Tablespoons butter
1/3 cup white wine
1/3 cup heavy cream
Salt, to taste
Fresh ground pepper, to taste
Sprinkle MSG, if you’re so inclined
- Mince your mushrooms and onions /shallots as finely as possible. If you have a food processor, this is an ideal time to use it. If you don’t, a box grater’s large holes are about right. If you just have a knife, reduce your mushrooms and onions to a fine dice.
- You’ve been watching leftist political theory on YouTube. If you don’t know how to mince an onion, YouTube can help you there too. Comrade, you owe it to yourself and your fellow leftists to know your way along a kitchen.
- Melt butter in a large skillet on medium heat, then add finely minced mushrooms and onions /shallots. Add a generous pinch of salt, it will help draw out the moisture.
- Cook mushrooms, stirring occasionally, on medium heat until they have released and evaporated their moisture and they are starting to brown, this can take 10 to 20 minutes.
- Add white wine, cream, and black pepper and cook, continuing to stir occasionally, until thickened. You’re looking for a consistency that is spreadable but not pooling.
- Taste, and adjust for salt and acid.
If you’re avoiding wine, you can substitute 2 tablespoons lemon juice and increase cream to achieve the correct texture.
This recipe has not been tested with vegan substitution and I am not a vegan cook, but I suspect vegan cream cheese would be a good sub for the cream in this recipe (adjusting other liquids, of course).
This is excellent on crusty bread, stuffed in a piece of chicken before searing, or schmeared on a sandwich. Thin with additional cream (or wine, or oil) to sauce pasta or meat.
Caprese Salad with Balsamic Glaze
by zzippycorgi
Serves 4
3 to 4 medium ripe tomatoes (about 1 1/2 pounds)
1 pound fresh, whole-milk, mozzarella cheese, sliced into 1/4 inch-thick rounds
1/2 cup packed fresh Basil leaves
Sea salt flakes
Fresh-ground black pepper
2 Tablespoons extra-virgin olive oil
Balsamic Glaze (see Balsamic Glaze recipe below)
- Arrange tomatoes and mozzarella in alternating pattern on a large platter.
- Scatter Basil leaves on top of the tomatoes and mozzarella.
- Generously season with flaked sea salt and pepper to taste.
- Drizzle with olive oil and balsamic glaze over the tomatoes, mozzarella and basil. Serve immediately.
Balsamic Glaze
1/2 cup yield
Around 20 minutes cooking time with 10 minutes cooling time.
2 cups balsamic vinegar
- Pour vinegar into a small saucepan and bring to boil over medi-high heat.
- Reduce heat to medium and simmer, stirring occasionally, until the vinegar thickens and will coat the back of the spoon and is reduced to about ½ cup. This should take about 20 minutes.
- Set aside to cool for 10 minutes. Glaze should thicken slightly as it cools.
- This glaze can be stored for up to 1 month in an airtight container in the refrigerator.
Sunny South Dallas Potatoes
by Sunny South Dallas AFA
2 32-ounce bags cubed hash browns
16 ounces sour cream
8 ounces shredded cheese
1 cup butter
1 cup onion (red or white whatever you got)
1 can cream of chicken soup
- Get a big ass bowl and mix everything up really good and tell a comrade that you love them.
- Preheat oven to 350 and unionize your workplace
- Put in a big ass casserole dish or two and bake at 350 for 1 hour 15 minutes while making a plan for a street altercation with a larger fascist and practice it.
Serving with beers to your friends/family/houseless neighbors/comrades/fellow workers is best.

The Cornbread Poem by Saisons
This recipe is from an old family cookbook, and is presented in rhyme which helped me commit it to memory, and it was the first thing I learned to cook on my own. Notes are provided where needed for clarity.
| Two cups of cornmeal | Grind of cornmeal is up to you, fine gives a lighter crumb vs coarse |
| One cup of wheat | Flour, either all purpose or self-raising |
| One cup of sour milk | buttermilk |
| One cup of sweet | milk |
| Two good eggs | |
| That well you’ve beat | |
| Two tablespoons | |
| Of butter new. | i substitute lard, melted |
| I like it sweet, | |
| If you do too, | |
| Two teaspoons of sugar | can be omitted or increased to taste |
| Will nicely do. | |
| Salt and soda, | teaspoon. If using self-raising flour, you can omit the baking soda, or include for a more cake like cornbread |
| each a spoon. | |
| Mix up quick, | stir until incorporated |
| and bake it soon. | in a greased pan, I prefer cast iron, in preheated oven 375 F / 190 Celsius for about 20 minutes, or until a knife inserted in the center comes out clean. I like to brush a bit more shortening on the top and put under the broiler to brown the top. |
| The best of all | |
| cornbread to eat. |

Sauces & Seasonings
Traditional Appalachian Chocolate Gravy (Vegan)
by Beth Foster
Chocolate Gravy is a traditional Appalachian breakfast food served over hot biscuits. The history of chocolate gravy is unknown but some theories are that Appalachian European settlers encountered traders from Louisiana who introduced them to Mexican chocolate dishes and the chocolate gravy is a merging of the cuisine of the two cultures. The recipe here is an adaptation of my great aunt Malzora Bernard Dunbar’s recipe. The only changes I make to make it vegan are replacing the dairy products with nut milk products.
2 Tablespoons flour
2 Tablespoons cocoa
3/4 cups sugar, 1/2 cup water
1/2 cup plant-based milk (soy, almond, oat, etc.)
2 Tablespoons oil
- Combine flour, cocoa and sugar, pour mixture into hot oil in a heavy skillet. Stir well, until wet.
- Add water and milk, cook and stir until lumps disappear.
- Serve over hot biscuits with a bit of plant-based butter.
Faye’s Cajun Seasoning
by Faye Ecklar
2 parts smoked paprika
1 part cayenne
1 part garlic powder
1 part onion powder
1 part black pepper
1 part dried thyme
Mix all ingredients thoroughly, then put in a jar or spice container. I typically make enough at a time to fill a 500ml jar.
Basil Pesto
by zzippycorgi
2 cups fresh picked basil leaves
3 large garlic cloves
3/4 cup pine nuts
3/4 cup good quality olive oil
3/4 cup fresh-grated parmesan cheese
1/2 teaspoon salt
1/4 to 1/2 teaspoon fresh cracked pepper
- Place basil, nuts, garlic and olive oil in food processor fitted with a metal blade.
- Process until fairly smooth, wiping down sides a couple of times as needed.
- Add cheese, salt and pepper and pulse a few times to mix.
- Use immediately or freeze in ice cube trays.
- Once frozen, pop out of trays and place in a freezer safe bag.

Stone Soup For My Family By Drew T.

ne time, very recently, many groups of people we can call The Working Class struggled to feed themselves or their families.
In one town, one we all know, the people had almost nothing to eat and for sure had nothing stored for later. Of course these people were very scared that they would all starve, so each home decided to hide away just a small bit of what little they had. They for sure didn’t tell friends or neighbors of their hidden items.
One day a woman, we shall call her Aunt Tifa, came in to the town. She asked so many in the town where she might get a meal and a place to get some rest as she had been away battling in the streets and was so worn out.
She was told at every home she stopped at “We are poor people who have nothing for ourselves even so its best you try another town” and on she went to each door.
She finally stopped, saw many were watching her travel in their neighborhood and she shouted to them “Ya’ll ever had some Stone Soup? Let me get my cooking pot out of my van and get a fire started, you all deserve something to eat.”
She proceeded to build up a fire in an open field in the neighborhood, got some water in the pot from a spigot on one of the houses and set it on the fire. She then reached in to her backpack, at this point the entire neighborhood was watching, and grabbed up an ugly old grey rock that was wrapped in an old towel and dropped it in to the pot. Everyone stared in amazement, mouths starting to water at the idea of some delicious and maybe magical soup, thinking to themselves how do they get her to share.
Of course Aunt Tifa leaned over stirring the soup, sniffing so loudly and smiling that smile when you know something is going to be very tasty. The people started to really think about asking if they might get a taste of this delicious soup Aunt Tifa was cooking.
“Ahh,” Aunt Tifa said to herself loudly “I love a bit of amazing Stone Soup but if I had just a bit of cabbage it would be even better.”
One of the men crowding around ran back in to his house, knowing he had hidden a head of cabbage for later and came running back to say “I do have this one head of cabbage, maybe I could add this to your stone soup and we can share this delicious filling meal?”
Of course Aunt Tifa smiled and said “please cut it up and drop it in to our soup, its our soup now friend.”
Now at this point Aunt Tifa realized that she remembers, loudly declaring “One time at the battle of Portland some of the amazing people there added some beef to our communal Stone Soup, it was shared for weeks because then we had so much. I sure wish someone had some beef, it was so filling.”
One of the women standing around happened to be a meat cutter at the local market and had been hiding a delicious roast in her freezer, hoping to save it for the perfect meal for her family. She ran down the block and returned quickly with this beautiful roast asking Aunt Tifa if she might want to have the roast for her delicious soup so they could all share this delicious stone soup just like she had before in Portland. “Of course she said, lets cut it up and it will absolutely be so filling for us all to share.”
At this point so many standing around knew they had a few carrots, some onions, a few stalks of celery and quite a few potatoes from their gardens they had been hiding away. Everyone ran back to get a bit of what ever they had, even a few nice loaves of crusty bread showed up. Soon enough the big pot was steaming and popping, the smell wafting around the group had everyone ready to eat. When the soup was ready everyone filled their bowls, and stomachs, with the most amazing and magical soup each had ever tasted.
Many offered Aunt Tifa anything they had in barter for her magical stone, they knew it would help them each make huge pots of soup to feed them through tough times but she told them one thing, “I can’t sell this stone to you, but I suspect that if you remember that each of your neighbors can come together you will make a very delicious soup by sharing, try that as often as you hunger.”
After a night of rest in one of the homes Aunt Tifa rose and got on her way, more cities to make sure could share in her amazing Stone Soup.
Sometimes community aid is just going to where the people live and helping them see what can be brought together to help them all.

Aunt Tifa’s Stone Soup For My Family
Remember, add or subtract what your group has. This is a soup that tastes best shared.
1 Tablespoon oil, preferably olive but most any will work
1 cup onion, chopped
2 potatoes, peeled and chopped
2 large carrots, peeled and sliced
4 cups broth, stock, or water
1 cup vegetable or tomato puree.
3 stalks of celery, chopped
3 large tomatoes diced
1 to 2 cups cooked beef, chicken or vegetarian protein substitute
1 cup cooked beans
1 teaspoon Italian or Creole seasoning
Salt and pepper to taste
Heat the oil then add onion and cook, stirring, on medium-low for 5 to 6 minutes.
Add the potatoes and carrots and stir. Continue cooking for another 5 minutes.
Stir in the broth and puree.
Add whatever is left. Stir well and bring to a simmer.
Simmer for 20 to 30 minutes, until the vegetables are tender.
Adjust seasonings for your personal tastes.
Soups
New England Clam Chowdah
by Kitty Stryker
This is a recipe my mum passed down to me, having adapted it over the years from a Bon Appetit recipe she clipped. Traditionally, we made it to eat Christmas Eve, but now that I live on my own I make it far more often — it’s convenient (no fresh clams), so creamy, and reminds me of home. If you want to jazz it up, I recommend cutting up some preserved lemons and slipping them in there — that’s my addition to the family recipe!
4 ounces fatty ham, or bacon (note: NOT highly flavored maple bacon; lots of smoke OK)
3+ medium onions, chopped
2 med celery stalks, chopped
3-4 medium potatoes- we like red or golds
2 ~10-ounce cans baby clams, drained with liquid reserved (extra indulgent if you add 3)
2 cups water (optional)
1/2 teaspoon dried thyme
1 bay leaf
White pepper to taste
Salt to taste (we usually do not add extra, except a wee amount when sautéing the veg)
2 cups milk, or 1 can evaporated milk (around 1 1/3 cups)*
1 cup cream (unnecessary with evaporated milk)
3 Tablespoons unsalted butter
3 Tablespoons flour
- Brown ham or bacon till almost done. Pour off fat if you have more than 1-2 tablespoons.
- Add chopped onions and celery, and a tiny sprinkling of salt. Sauté slowly until the veg is soft but not browned.
- Meanwhile, cube the potatoes, in roughly 1/2 – 3/4-inch chunks.
- When the onions and celery are softened, add the potatoes, plus the liquid from the clams, the water (start with 1 cup), thyme, bay leaf, and pepper. simmer slowly until the potatoes are just done, probably 15-35 min.
- Meanwhile, melt the butter. Add the flour, stirring and cooking until it’s bubbly. Add the milk/cream or evaporated milk slowly, stirring it in. Once it starts to thicken, add some of the liquid from the soup.
- When the milk mix is thick, and the potatoes are done, stir them together. Add the clams and heat until warm.
- Serve.
*We usually use the evaporated milk- skimmed or not, as you prefer — it re-heats better. Depending on the consistency you want, you may want to add more water if you go this route.
Creamy Chicken Wild Rice Soup
by Comrade Hotdish
For the wild rice:
1 onion, diced
Enough butter to cook the onion and toast the wild rice
1 cup wild rice, rinsed
3 cups stock — I usually use chicken but have found mushroom broth is very nice with the wild rice flavor
Salt & pepper
Fry the onion until translucent over medium-ish heat in a small pot with a lid.
Add rinsed wild rice to onion and cook until it smells a little toasty/nutty.
Add stock, season, bring to boil, cover, lower flame and simmer until done to your likeness.
Soup:
1 onion, diced
2 full sized/10-12 baby carrots, diced
1-2 stalks celery
A handful of mushrooms (most any variety), diced
Butter to cook veggies
Garlic (you measure this with your heart)
1/4 cup dry white wine
Herbes de Provence
1 bay leaf
2 Tablespoons all-purpose flour
3-4 cups chicken/veggie stock
1/2-1 cup half and half or cream
Cooked chicken meat (this is a great way to use leftovers)
Salt & pepper
A pinch of cayenne (if you’re nasty)
- Melt butter in larger pot.
- Add mushrooms with a pinch of salt over medium-high flame; after they have let some liquid cook out add onion, carrot, and celery with another pinch of salt. Allow to brown nicely.
- Add the garlic and cook for about a minute, then deglaze with a good glug of wine.
- After the alcohol has cooked off, add more butter (if you need) to make a roux with the flour, then add the stock, bay leaf, herbes de Provence, and cooked wild rice. Boil for a bit to thicken up, add the cream, add the chicken meat, and simmer until desired consistency. i like mine thicc.
- Remove the bay leaf before serving.
These measurements are all estimates — please experiment and find out what you like! it can easily be scaled up to feed a crowd. it can be made vegetarian or vegan by omitting the chicken meat, swapping the chicken stock for vegetable or mushroom stock, the butter for oil, and using the non-dairy unsweetened creamer of your choice.
Salmorejo
by Talia Lavin
2-3 pounds tomatoes (go nuts! like … 5 or 6 big ones at least)
3 cloves garlic
1 green bell pepper
1/3 cup red wine vinegar
1 white roll or sizable hunk stale white bread
1 cup olive oil salt
To taste: hard boiled eggs and prosciutto, for garnish (optional)
- Chop the veg.
- Soak bread in water, then squeeze it out.
- Add all ingredients except olive oil to a blender. blend. Then pour in the olive oil slowly while continuing to blend.
- Chill until cold to the finger.
- Top with chopped hard boiled eggs, prosciutto and drizzle of olive oil.
Salmon Chowder
by Lisa Sharlach
This is my mother’s favorite. It’s based on a recipe (minus the soymilk) from 1947 in a cookbook by Meta Given that I have used so much that it no longer has a cover or title page. I believe it is “The Modern Encylopedia of Cookery.”
2 large potatoes, cubed
1/2 cup carrots, cubed
Salt
2 cups water or vegetable stock
2 Tablespoons onion, chopped
2 Tablespoons flour
2 cups plain soymilk
1/2 tin salmon, undrained
1 dash marjoram
4-5 drops Worcestershire sauce
1/2 cup celery, thinly sliced
- Put potatoes and carrots in medium to large-sized pot, add salt and water, cover and cook until just tender.
- Remove from heat, but don’t drain. In a saucepan, sauté the onion in butter 3 minutes, blend in flour until smooth.
- Add soymilk slowly, stirring constantly over medium heat until the mixture comes to a boil and thickens.
- Don’t drain the salmon. Crush the salmon bones and flake the salmon.
- Add the salmon (liquid, bones and all) to the vegetables, then add the soymilk mixture. Stir, heat through, and serve right away.

Rainy Day Zucchini Soup
by Qinqdai
It’s late summer and you have way too many zucchini. Do this and freeze it for a rainy day.
6-8 zucchini (roughly two pounds) cut in rounds (take off the butt and the stem slice)
If you’re using a really big zucchini, make sure there aren’t any tough seeds.
1 onion, roughly chopped
Approx 3 1/2 cups vegetable, chicken or herbed broth
4-5 cloves garlic
4 Tablespoons butter or olive oil.
- Sauté onion at medium high until clear in butter (for vegetarian or other) or olive oil (for vegan)
- When onion bits are clear, throw in chopped garlic, stir for 30 seconds then add your chopped zucchini and liquid.
- Liquid is water/broth equalling 3 1/2 cups. This is where the magic happens
- If you have left over chicken broth, or vegetable add that amount, plus extra water. If you don’t have broth, think of what you do have that’s Italian spices. Oregano (fresh or dried), say a teaspoon, thyme, rosemary.
- Boil the water/broth/zucchini for about 15 minutes or until they are soft.
- Puree, with either a blender, an immersion blender, or your steely determination to make a good soup.
- Salt to taste.
- Can be frozen, reheat to serve. Serve hot with Parmesan cheese, unless you’re vegan, in which case consider topping with salt and parsley, or fresh dill. Do not top with Parmesan if freezing.
Vegetarian Onion-mushroom Soup
by Laufey Sløjtr
To make stock:
1 1/2 ounces dried mushrooms
1/2 onion
2 carrots
3 stalks celery
1 teaspoon whole black peppercorns
2 teaspoons herbs de Provence
Garlic, at least 3 cloves
1 Tablespoon oil
Sufficient water
Roughly chop the vegetables, and sauté lightly in oil at the bottom of a large stock pot.
When the vegetables have just begun to brown, combine all ingredients in the same pot with at least 2 inches of water covering everything.
Bring to a boil, then immediately reduce to a bare simmer.
Simmer for at least one hour — the stock should darken to a deep brown color, with a strong, pleasant fragrance indicating a rich broth.
Remove from heat and separate the stock from solids by straining; the solids may be discarded at this point.
Onion soup:
Stock
4 large sweet onions
Salt, to taste
- Chop the sweet onions according to your preference — long ribbons are traditional, though I prefer small, finely-chopped pieces.
- Coat the bottom of a large stock pot with cooking oil of your choice; I use an even mixture of butter and olive oil, but other choices can work just as well.
- Sauté the onions over medium heat until they are completely transparent and have begun to caramelize.
- Add the stock to this pot, and bring to a boil. Again, once it has begun to boil, reduce to a simmer, and cook while stirring occasionally for about thirty minutes.
- At this point, taste the broth, and add salt, plus any other herbs or spices you feel may be necessary to round out the flavor.
Serve with cheese-covered garlic bread, or, use garlic bread and cheese to prepare grilled cheese sandwiches to serve with the soup.
Grandma Bessie’s Chicken Soup
by AWKWORD
1 large whole chicken
1 green pepper
2 large onions, cut in quarters
Bunch of dill, use 1/4 cup
Bunch of parsley, use 1/4 cup
10 baby carrots
2 stalks celery, with leaves if possible
1 turnip
2 parsnips
Salt and pepper to taste
- Put chicken in pot and cover with water. Add cleaned vegetables, whole turnip and green pepper (cored).
- Wash parsley and dill carefully and put rubber band around them together so you can remove it easily after cooking.
- Add salt and pepper. Bring to a boil and then lower to medium-low heat.
- Cover and cook until meat falls off bones when you use a fork to test.
- Let cool awhile then remove chicken with tines and take out large pieces of vegetables.
- Put a colander over bowel and pour soup through to remove the rest of the vegetables so you have a clear broth.
- Cook small egg noodles to serve with soup.

Swedish-Jewish Southern Soul Food: Dill Salmon, Latkes & Okra
by Eleanor Goldfield
The words ‘soul food’ evoke different sensations for different people in different places. For me, a clash of cultures and regions, several tastes, places and people come to mind.
My grandmother loved pushing food on people as if she were a Jewish grandmother despite being a pagan Swede. She used to call it ‘mysmat’ which basically translates to cozy food. Her wide array of choices in this category spanned from Swedish pancakes to reindeer sandwiches and I have dozens of memories of the two of us in the kitchen cooking up cozies before we dug in by a fire or watched the midnight sun dance along the horizon without ever actually setting. On the other side, there’s my dad’s cousin who excelled in the art of latkes, matzo brei and more. She used to say that all Jewish food is soul food, except for plain matzoh — that’s purely there to remind you of Jewish suffering.
As a child of immigrants, I was raised between Sweden and what’s now called North Carolina. Carolina BBQ was a soul food I ate my fair share of as a kid and one of my favorite sides to order at our hole-in-the-wall restaurant was fried okra. This was mostly because we were never allowed fried foods at home so it was a sinful treat to be able to dig into a mound of fried sides while simultaneously indulging in a giant rack of ribs. This recipe will be for grilled okra but don’t worry, it’s still very soul foody :)
So, these are my soul food inspirations. Regardless of what the words ‘soul food’ made you think of, my experience has always been that soul food speaks to a deep sharing of self. It’s a profound offering of welcome and humanity in deliciously edible form. For me, throwing these inspirations together into one funky dish is a way for me to share who I am. And I’m grateful to be able to pass on some of this inspiration – however you use it, however you edit, substitute and make it your own, it’s rad to think of this clash of cultures collaborating with yours to create your very own unique soul food recipe. Now as they say in Yiddish, Fress! (pig out!)
Dill Salmon:
3 or 4 sprigs of dill
2 or 3 cloves of garlic
1 salmon filet
Cooking oil
Salt and pepper
- Preheat the oven to 400 and throw some cooking oil into the pan. I only have cast iron pans because fuck teflon cancer, and cast iron just cooks way better (plus you get the added bonus of ingesting some extra iron in every meal).
- Chop up your garlic cloves and your sprigs of dill. You’ll want them to be relatively minced as they’ll be nestled into the filet.
- Slice 6 or 7 indents into the salmon filet and distribute your garlic and dill evenly. Add salt and pepper.
- Take a small spoon and spread some oil on top while and let sit while you wait for the pan to heat up.
- When the pan is smoking, toss the salmon in. Sear it for 2-3 minutes and then flip it over. Here I usually add some more salt.
- Once you’ve done a couple of minutes per side, get yourself an oven safe pan and transfer it to the oven.
- Depending on your oven and the thickness of the filet, you’ll want to cook it for roughly 15 minutes.
- You can easily check to see where you’re at by cutting into it. It should be a bit more pink than the outside but not raw looking. This is, to be honest, a bit of a trial and error game because you can easily overcook and dry out your salmon. If you’re unsure, I recommend checking pretty often after the 10 minute mark.
Latkes:
I like to cook it in this order because I like to get some of that salmon fat onto my latkes. You can cook the okra next or use a different pan for each, but that’s my little tip for some extra yum.
Traditional latkes call for chicken schmaltz, aka chicken fat. If you’re like me, you’re not a big fan of chicken fat and you’re too lazy to make it or go around looking for it, so you use cooking oil (I prefer high heat oils like sunflower or avocado oil).
So, you’ll need:
Approximately 1 pound of potatoes
1/2 a yellow onion
1 egg
2 Tablespoons matzoh meal (you can also use breadcrumbs — I often just take crackers from the pantry or a stale bread end that’s lying around)
1 cup cooking oil
Sour cream for serving
- Grate potatoes and onions either with a food processor (if you’re one of those fancy folks who has one) or get yourself a workout by using a regular grater. You want them to be in thin enough slices so you can ball them up into a pancake.
- Squeeze the potatoes and onions out so that they’re dry. I usually use a bit of cheese cloth but a paper towel is fine.
- In a bowl, mix the potatoes, onion, egg, matzoh (or breadcrumbs), salt and pepper til you have a nice evenly distributed mixture.
- Form the latkes. You can get as picky here as you want. I just do it by hand but I know some folks like to have very even latkes. The basic goal here is to create a flat pancake-like patty of your mixture.
- Heat the oil in your pan and fry until dark golden brown on each side. Here again, you want the pan to be hot when you put them in so that the latkes sizzle upon entry.
- Scoop ’em up with a spatula and pat ’em dry on paper towels.
Okra:
This one goes the fastest so I save it for last. At this point your oven might even be off with your two main characters staying warm in the afterglow.
All you need here is:
3 handfuls of okra
1 Tablespoon cooking oil
Salt and pepper
- Chop your okra into 1/2 inch pieces while you heat up cooking oil in the pan.
- Once the skillet is smoking, toss the okra in.
- Keep the pan on high heat while you move the okra around pretty continuously. They’ll burn easily so it’s best to just hover and move that spatula around.
- Once the okra looks evenly browned, you’re done!
All Together Now!
The aforementioned sour cream goes amazing with the salmon and the latkes (I mean dill and sour cream is a thing for a reason).
I don’t usually plate but let folks grab what they want.
If you’re a wino, this little collection goes real nice with an oaked chardonnay.
Entrees
Sweet & Sour Meatloaf
by Charlene Gelb
1 small onion, minced
1/4 cup crushed saltine crackers
16 ounces canned tomato sauce
1/2 cup brown sugar
1/2 cup white vinegar
2 Tablespoons mustard
1 egg, slightly beaten
2 pounds ground beef
1-1/2 teaspoons salt
1/4 teaspoons pepper
- Mix tomato sauce with brown sugar, vinegar, and mustard.
- Combine remaining ingredients with 3/4 cup of the tomato mixture. Shape meat into a loaf and cover with remaining sauce.
- Bake 2 hours at 350.
Fauxgolian Beef
by Spencer Sunshine
A meat-eating friend used to cook Mongolian beef—as far as I could tell, it was the only dish he could cook. It looked delicious, even though I never ate it. So here is something I came up with, not to copy it, but that ended up with a greater or lesser resemblance (depending on your perception) to it. It’s a quick and delicious meal that seems fancier than it is.
Musical accompaniment:
Stage Bottles
[Check out stagebottles.de -Kit]
Cooking time:
20 minutes
Ingredients:
Rice
1 onion
Garlic
Ginger root
Handful of string beans
2 tomatoes
Seitan
- Put the rice on. You’ll be able to cook the meal by the time it’s ready.
- Bring a pan full of water to a boil while your prepare the string beans as you like. Blanch them for 2–3 minutes.
- Cut up the onion and garlic to your desired size. Either grate or finely cut the fresh ginger, remembering that a little goes a long way. Sauté the three together as a base until the onions start to turn a little brown.
- While the base is cooking, clean and cut the seitan to preference, and cube the tomatoes.
- When the base is ready, throw in the seitan and tomatoes. Cook until the tomatoes start to break down, but before they’re mush.
- Serve over rice.
Baton Rouge Jambalaya
by Dan Arel
Serves 8 – 10.
For vegan option, use veggie meat, tofu, or no meat substitute, and replace broth with your choice of vegan broth or water. [Or keep reading for another vegan option -Kit]
Seasoning Mix:
Mix together and set aside.
4 bay leaves
1/2 teaspoon cayenne pepper (or more if you like it spicier)
3 teaspoons salt
3 teaspoons white pepper
2 teaspoons dried thyme leaves
1 teaspoon black pepper
1/2 teaspoon rubbed sage
Measure and set aside
3 cups of uncooked rice
1 pounds andouille sausage
1 pounds smoked sausage
3 pounds chicken breast
6 to 8 celery stalks
1 large onion
2 green peppers
8 to 10 fresh garlic cloves
6 cups of chicken broth
- Chop all the vegetables. Set aside.
- Cut chicken into cubes and slice sausage into even (not too thick) slices and place into a large pot. Cook over high heat until chicken and sausage are browned and the bottom of the pot is completely dry. You will need to stir often and scrape the bottom of the pot. You will see some burning at the bottom of the pot, this is okay. The secret is to make sure the bottom of the pot is completely dry.
- When meat is done, add seasoning mix and continue to cook over medium heat. Making sure the seasoning is well mixed.
- Add all the chopped vegetables. Continue cooking over medium heat until vegetables are medium tender.
- Add the uncooked rice and mix well.
- Add 6 cups of broth and bring to a boil. Reduce heat to low and cook uncovered until rice is done and the bottom of the pot is dry.

Vegan Jambalaya For A Crowd
by Faye Ecklar
Good for potlucks or distros, lots of nutrients.
4 Tablespoons olive oil
2 cups diced onion
2 cups diced bell pepper
2 cups diced celery
2 cups carrots, cut in medallions
8 cloves garlic, crushed
2 cups diced tomatoes
2 14-ounce cans red beans OR dark red kidney beans, drained
2 14-ounce cans black beans, drained
2 large turnips
Large bunch of greens, roughly chopped (turnip greens, mustard greens, collard greens, kale, chard, etc.)
Medium bunch of parsley, finely chopped
4 cups white rice
3 to 4 quarts vegetable stock
1/4 cup soy sauce
4 to 6 Tablespoons Faye’s Cajun Seasoning
Salt
Louisiana hot sauce
- Dice up the turnips into large chunks and add them to a small saucepan along with the black beans, a pinch of salt, and about 2 cups of vegetable stock. Bring to a boil and let simmer 20 minutes while preparing the other ingredients. When turnips and beans are soft, add them to a blender or food processor and process until a loose paste forms. This will act as a thickener for the jambalaya, and a way to add the beneficial nutrition from turnips without the “unattractive” vegetable being noticeable.
- In your largest pot add the oil, onion, bell pepper, celery, and carrots with a pinch of salt and sauté over medium low heat 15 to 20 minutes until onions begin to turn translucent and carrots begin to soften. Add the crushed garlic and sauté an additional 2 minutes.
- Add the red beans and tomatoes and stir well to combine. Add the white rice and two to three quarts of vegetable stock, plus the soy sauce and cajun seasoning. Add 1 to 2 Tablespoons of salt. If using tough greens like kale, add them now. Bring to a boil, reduce to a simmer, and cover.
- Cooking time will be variable depending on the size/shape of your pot and the power of your stove. Allow it to cook at least 20 minutes, then begin checking the rice for doneness every 5 minutes. Add more stock if necessary.
- When rice is just a little al dente, add any tender greens and parsley, the turnip-bean paste, and salt to taste and stir well to combine. Cook an additional 5 to 10 minutes.
- Serve with hot sauce on the side.
Breadless Bean Veggie Burgers
by Kit O’Connell
As the name suggests, these “burgers” are designed to be served as a stand-alone patty, without a bun. I usually serve them with chopped up tomatoes and lettuce, condiments for dipping, or other sides like French fries. You can also use one or two patties to make a little sandwich. Credit where it’s due: I took this over a decade ago, from a recipe by the food blogger Heidi Swanson, and made it my own. Measurements are approximate.
2 1/2 cups cooked or canned beans (drained) (you can use almost any bean: chickpea, black-eyed peas, black beans, etc.)
2 cups flour
2 eggs
1/4 cup shredded cheese
1/4 cup coconut milk or other milk
1 teaspoon garlic powder
1 teaspoon onion powder
1 teaspoon Curry Powder
Dash or two of paprika
Salt and fresh-ground pepper
Optional additions: Crushed walnuts or pecans, pumpkin seeds, hemp hearts, sesame seeds, etc.
- In a large bowl, mash up the beans and any crunchy additions like nuts or big seeds. I like a bit of a rough texture so it doesn’t need to be too evenly mushed.
- Mix in flour and eggs, then spices, shredded cheese and any additional add-ins like hemp hearts.
- Chill in the fridge for 20 minutes to an hour while you check in with your group chats.
- Heat a little oil in a nonstick pan. I typically prep a plate for the patties off to the side, with a paper towel to catch any excess oil.
- The dough should be fairly moist, so add a splash of coconut milk or other liquid if it’s too dry.
- Drop a big spoonful of dough into the pan, forming patties over the heat. You can make small patties to top as appetizers, or bigger ones for entrees, but make sure they aren’t so big they fall apart.
- Cook for about 8 minutes, flipping every couple of minutes, until both sides are a light golden brown.
This recipe is easy to adapt to larger quantities or gluten free or other special diets. I melt cheese on a few to serve hot, then save the others for lunch the next day. These keep pretty well for a day or two in the fridge and can be reheated in the oven with more cheese.

Chicken Soup Antifa Surprise
by Auntie Fa
1/2 boneless breast of chicken
3 heaping Tablespoons cream of chicken or cream of celery soup
Salt and pepper
Carrot, onion and potato slices
- Layer vegetables on foil sheet (heavy duty foil is best)
- Place chicken breast on top, basting it with soup
- Salt and pepper to taste
- Wrap all in tin foil (to seal the foil packet, bring short sides together in the middle and fold/roll all the way down to seal, then roll up the end.
- Roast on coals for 20 to 25 minutes.

Ratatouille (Rat-Tat-Too-Eee)
by G. Carlo
Reprinted with permission from The IWOC Cookbook
2 onion, chopped
4 peppers, cubed
4 small zucchini, cubed
2 small eggplant, cubed
Lots of garlic
4 tomatoes (chunks)
2 bay leaves
2 teaspoons each of basil & marjoram
1 teaspoon oregano
Dash of rosemary
6 teaspoons Burgundy wine
1 cup tomato juice
4 teaspoons tomato paste
Salt & pepper
Parsley for garnish
Sauté olive oil, garlic, bay leaf, onion and salt.
Add eggplant & tomato juice.
Add basil, marjoram, oregano, rosemary.
Cook till eggplant is semi-tender.
Add zucchini, peppers, salt & pepper.
Cook until vegetables are very tender.
Serve over rice with parsley garnish.
[I always love ratatouille best with a fresh, crusty bread … -Kit]
Red Beans & Rice
by Faye Ecklar
3 Tablespoons lard
1/2 cup diced ham
1/2 cup diced andouille sausage
1 cup diced onion
1 cup diced bell pepper
1 cup diced celery
3 cloves garlic, crushed
2 14-ounce cans red beans OR dark red kidney beans, drained
2 cups chicken stock
2 large bay leaves
1 Tablespoons Faye’s Cajun Seasoning
1 teaspoon brown sugar
1 teaspoon Louisiana hot sauce
Salt
White rice
Scallions
- Melt lard in a large cast iron skillet or saucepan.
- Add ham and sausage and lightly brown over medium heat.
- Add onions, celery, and peppers and a small pinch of salt and sauté until onions turn translucent.
- Add crushed garlic and sauté for 30 seconds. Add Cajun Seasoning.
- Add both cans of beans and allow them to fry for 3 to 5 minutes. Then add chicken stock, bay leaves, brown sugar, and hot sauce. Stir well to combine and let simmer 30 minutes over low heat, stirring occasionally.
- Use a potato masher or the back of a wooden spoon to smash the beans until your desired consistency is reached — anywhere from about 10% to 50% smashed is acceptable. Keep in mind the beans will thicken when taken off the heat. You may add a bit of water to thin the dish out if necessary.
- Add salt to taste and let simmer an additional 5 minutes.
- Serve over steamed white rice, garnish with scallions, with additional Louisiana hot sauce on the side.
Grandma’s Ground Beef Casserole
by Old Uncle Gordon
A whole bunch of folks from Sweden emigrated to America between the 1850s and the 1920s. My mother’s parents came to America from Sweden in 1906. They were farmers, and did all right for themselves.
But in the difficult years of the Great Depression, it was always prudent to have recipes with reasonably priced ingredients that FILLED YOU UP, and also happened to taste good. Please keep in mind that the recipe I will now share with you is probably not “healthy” as we understand good dietary health, but boy howdy, it brings back memories for me, and in moderation is quite tasty. Keep your head in the 1950s as you hunt down the ingredients (don’t be using “lean” meat or “skim” milk here!!)
- Coarsely chop two medium onions.
- Mix that into a pound of raw ground beef, and add two Tablespoons of butter.
- Brown that mixture in your favorite skillet.
- Do NOT drain off any of the fat!
- Remove from stove and blend in:
- 1/2 cup of UNCOOKED long grain rice
- 1/2 a cup of milk
- 1 can of condensed mushroom soup
- 1 can of condensed chicken noodle soup
- Salt and pepper
- Scoop this mixture into a buttered casserole dish.
- Add a layer of corn flakes on top, and then several small dollops of more butter!
- Bake in an oven at “moderate” heat for one hour.
- Set it on the counter to cool down a bit before trying to eat.
You might think it odd to bake raw rice like this, but it works just fine, and the rice soaks up the beef fat! (Again, I didn’t say this was healthy!) As it happens, this casserole refrigerates and microwaves very well, although the corn flakes might lose some of their crunch.
Trident Subs for 100
by Keith McHenry with Chaz Bufe
Reprinted with permission from “The Anarchist Cookbook“
Equipment: 20 quart or larger pot
Prep time: 30 minutes
Cooking time: 1 hour or longer
2 bulbs garlic, diced
8 to 12 onions, chopped
1/2 cup olive oil
1 Tablespoon thyme
2 teaspoons cayenne powder
2 Tablespoons sea salt
2 Tablespoons black pepper
3 or 4 16-ounce cans tomatoes, or 15 to 20 fresh tomatoes, chopped
4 to 6 squash (zucchini, summer, etc., with soft skins)
12 to 15 of any root vegetable (carrots, potatoes, etc.)
2 bunches any dark green leafy vegetable (collards, kale, spinach, etc.)
2 or 3 cabbages or 5 or 6 eggplants
100 sandwich rolls
- Sauté the chopped garlic and onions in a dry pan or in oil over medium high heat in a 20 quart or larger pot until the onions become clear.
- Add spices, then all the chopped vegetables and either fresh or canned tomatoes. (If you do not have any tomatoes, add a little water to start the vegetables cooking.) Stir often to prevent sticking.
- Once the liquid in the bottom starts to boil, lower heat to medium low. Cook until the vegetables are soft and the sauce is thick like stew, usually about 1 hour, but simmering longer enhances the taste.
- Adjust seasonings, especially salt, pepper, and cayenne.
- Serve on a sandwich roll, bread, or brown rice.
We call this a trident sub because it is spicy “hot”!
Roasted Garlic Butter Salmon with Potatoes & Asparagus
by zzippycorgi
Hearty salmon, potatoes and asparagus for you and a few comrades. Serves 4 and takes around 40 minutes.
1 pound baby Yukon Gold potatoes halved
2 Tablespoons extra-virgin olive oil, divided
3/4 teaspoon salt, divided
1/2 teaspoon ground pepper, divided
1 bunch, about 12 ounces asparagus, trimmed
2 Tablespoons melted butter
1 Tablespoon lemon juice
2 cloves garlic, minced
1 1/4 pounds salmon fillets, skinned and cut into 4 portions
Chopped parsley garnish
- Preheat oven to 400° F.
- Toss potatoes, 1 Tablespoon oil, 1/4 teaspoon salt and 1/8 teaspoon pepper together in medium bowl.
- Spread evenly, in one layer, on a large rimmed baking sheet.
- Roast about 15 minutes, until potatoes start to soften and brown.
- While potatoes roast, toss asparagus with remaining 1 Tablespoon olive oil, 1/8 teaspoon salt and 1/8 teaspoon pepper in the medium bowl.
- In a small bowl, combine butter, lemon juice, garlic, remaining 1/4 teaspoon salt and 1/4 teaspoon pepper and set aside.
Salmon preparation:
- Sprinkle salmon with remaining 1/8 teaspoon salt.
- Move potatoes to one side of pan.
- Place salmon in center of pan and drizzle with butter mixture.
- Spread asparagus on other side of the pan.
- Roast until salmon is just cooked through and the vegetables are tender, about 10 to 12 minutes.
- Garnish with parsley.
Street Forum Solidarity Tacos
Street forum is an abolitionist mutual aid group that operates a pop up distribution site for unhoused folks in downtown Austin
Makes ~ 120 – 140 Tacos
Total time ~ 90 – 100 min
These tacos are flavor and calorie dense with added salt and acids to make them safer to keep in one’s pockets for a while before eating. Street Forum members making this recipe must adhere to FDA safe food handling guidelines as well as work to minimize the amount of time that the tacos spend in the temperature Danger Zone.
Special equipment:
32 quart pot
12 quart pressure cooker
Large, rigid metal spatula
Medium saucepan
Large bowl
Spider (or large slotted spoon)
120 – 150 flour tortillas
4 pounds shredded cheese
for the beans
6 pounds dry pinto beans
1/4 cup salt
1/4 cup garlic powder
1/4 cup menudo spices or chile powder
1/3 teaspoon baking soda
3 teaspoons citric acid
The powder of 3 x 1000mg vitamin C capsules (twist open)
(optional) 2 12-ounce jars of Goya Sofrito
1/4 cup oil (any type)
8 bay leaves
for the potatoes
10 pounds russet potatoes
1/8 cup salt
1 1/2 Tablespoons citric acid
the powder of 3 x 1000mg vitamin C capsules (twist open)
1/4 cup MSG
1/4 cup garlic powder
1/4 cup stew herb (marjoram and thyme mixture)
(optional) 1/4 cup shaky parmesan cheese
2-3 cup high heat oil (grapeseed, peanut, etc.)
- rinse the beans (5 min)
Pour the beans into a large bowl and cover with water. Then, using clean hands, swirl the beans around in the water until it is muddy (about 30 seconds). Drain the beans and return them to the bowl. Repeat. - 2. season the beans (5 min)
Add rinsed beans to the pressure cooker pot. Top with salt, garlic powder, menudo spices (or chile powder), baking soda, citric acid, vitamin C powder, and optional sofrito. Stir until beans are evenly coated. - add and season the bean cooking water (5 min)
Fill the pressure cooker pot with 3 – 4 liters of water on top of the seasoned beans. Water level should be around 3 x the height of the beans. Pour oil on top of water, and stir everything together. Top with bay leaves. - cook the beans (40 min)
Fit the pressure cooker lid onto the pressure cooker pot and twist to seal. (This can take a few tries, but you will know the pot has locked when you feel it click) Heat pressure cooker on high. The pot will begin to vent about 25-30 minutes into cooking. Reduce heat to low for the remaining 15-20 min. - scrub the potatoes (15 min)
While the beans are cooking, fill a large bowl with water. Remove one potato from the sack and submerge in the bowl. Scrub the potato with clean hands or a vegetable scrubber until there is no dirt remaining on the potato. Once clean, place the potato in the 32qt pot. Repeat for each individual potato in the sack. Discard and replace muddy water with fresh water every 5-or-so potatoes. - add the potato cooking water (< 5 min)
Fill the 32qt pot with enough water to cover the potatoes. - cook the potatoes (30 min)
Bring the 32 quart pot to boil over high heat. Once boiling, allow potatoes to cook for 10 minutes, or until a fork can pierce them with some light resistance. Remove potatoes from heat and drain. Rinse the pot and return the potatoes to the pot. - allow beans to cool (~20 min)
While the potatoes are cooking, remove the pressure cooker from heat and allow to cool (naturally depressurizing) for at least 20 minutes before transporting. Do not attempt to open it until you have arrived at the taco rolling station. - season and chop the potatoes (10 min)
Sprinkle salt, citric acid, vitamin C powder, MSG, garlic powder, stew herb, and optional parmesan over the potatoes. Using a large metal spatula, chop and stir the potatoes until there are no chunks larger than 1 inch. Scrape spatula along the bottom edges and lift to stir, making sure the seasoning is evenly distributed - add hot oil (7 min)
Heat oil in a medium saucepan on high for about 5 minutes. Test by dropping a small piece of potato into the oil. The potato should float, sizzle, and brown in under 30 seconds. Once the oil is hot enough, quickly pour it over the potatoes and stir while it sizzles. Place lid on pot to hold in as much heat as possible. - transport supplies to taco rolling location
Once you have finished cooking, it is time to load up your car with the beans, potatoes, cheese, and tortillas. The pots may be very hot, so feel free to wrap the bottom of the pot in a clean towel so that the heat does not damage your car. I like to buckle them up with seatbelts so they don’t rattle around. When you arrive at the taco rolling location, get another volunteer to assist you. Sanitize the bottoms of the pots before placing them on a sanitized table. - mix it all together
Press the vent at the top of the pressure cooker to release any leftover steam from the beans. Then, remove the lid. With a clean, gloved hand, pick out the 8 bay leaves from the top of the beans. Then, using a spider or large slotted spoon, transfer beans to the pot of potatoes. Get a volunteer to add cheese while you stir the mixture together with the spatula. Once everything is evenly incorporated, the taco filling is complete! - set up stations
Taco stations should each have a bowl, and a stack of foil. Give a volunteer the tortillas to add a stack to each station, keeping in mind to push the tortillas out of the package without letting them touch the outside. Meanwhile, use the spatula to dish the taco filling into the bowls for each volunteer. - roll tacos
Using clean, gloved hands, take a tortilla from the stack and use it to scoop up about 1/3 cup of filling. Then, fold it in half and place it at the base of a sheet of foil (foil should be portrait-oriented (tall-ways)) Roll the foil tightly around the taco once, then fold in the sides so that they are tightly locking in the taco. Finish rolling the foil until it is entirely wrapped. Finish by squeezing gently to make sure everything is tightly sealed. Repeat until there is no more filling.

Desserts
Three-layer Labor Day Cake
by Jennifer C. Martin
This is an olive oil-cornmeal-rosemary cake with brown butter-honey buttercream frosting.
Frosting:
1 1/2 cups (or three sticks) of salted butter
5 cups powdered sugar
1/4 cup honey
1-3 Tablespoons whole milk or half and half
Cake:
3 1/4 cups all-purpose flour
1/2 cup yellow cornmeal
2 teaspoons baking powder
1 1/2 teaspoons baking soda
1 1/2 teaspoons salt
2 cups white sugar
5 eggs
1/4 cup honey
1 cup olive oil (use extra virgin for a stronger olive oil flavor or use regular olive oil for a more subdued flavor)
1/2 cup apple cider (either alcoholic or not is fine, but don’t use apple cider vinegar)
1 tablespoon vanilla extract
1/4 cup fresh rosemary, minced
For topping:
Honey/honeycomb bits
1-2 teaspoons rosemary
- Brown the butter. Using a stainless steel pan, let butter melt at medium heat, swirling it around occasionally to help it melt faster. Once it is melted, keep an eye on it — it will begin to turn a caramel-brown color, about 10 minutes. The moment you see the melted butter turn a brown shade, turn off the heat. It should smell amazing and nutty. Let sit for 10 more minutes, then cover the pan and move to fridge to harden.
- Preheat oven to 325 degrees Fahrenheit. Grease three 8-inch cake pans very well. You can then either flour the pans slightly, or add 8-inch parchment rounds at the bottom of each pan.
- In a large bowl, mix together flour, cornmeal, baking powder, baking soda, and salt.
- In an electric mixer fitted with a paddle attachment, beat together egg and sugar at medium speed, then high speed, until the mix is thick and pale yellow.
- Turn the mixer on low. Drizzle in the olive oil, then the honey, then the apple cider, and then the vanilla and mix for about a minute at medium-low speed.
- Add in the flour mixture in thirds at low speed. Combine until fully incorporated.
- Pour the batter evenly into the three prepared pans. Place all three in the oven for 45-50 minutes — or until a toothpick inserted into the cake comes out clean. If you can fit all the pans onto one oven rack in the center, do so, but if not, rotate the three pans between two center racks every 15 minutes.
- Remove cakes from oven. Let cool in pans for 10-15 minutes, then turn onto wire racks and let continue to cool.
- The brown butter from the refrigerator should be hardened by now. If it’s not, you can set in the freezer for about 10-15 more minutes. If it’s too hard, let soften until brown butter reaches room temperature.
- Once your brown butter has reached room temperature, add it to an electric mixer with the paddle attachment — make sure to get the brown bits at the bottom of the pan — and beat at medium speed. Add in honey, then slowly add in powdered sugar at low speed until combined. The frosting will be very, very thick. Add in milk or half and half, one tablespoon at a time, until it comes to a buttercream consistency. Then switch to the whisk attachment and beat at a high speed until the buttercream is fluffy.
- If cake layers are completely cool, set them on a cake stand or plate. Generously frosting between each layer (the cornmeal makes the cake a bit crumbly and the frosting between the layers will help retain moisture) and on the outside. It’s okay if the frosting looks a bit rustic.
- Drizzle optional honey/honeycomb pieces on top of the frosted cake, then sprinkle with additional rosemary.

Whole-wheat Shortbread (with Almond Variation)
by Anonymous Comrade
18 ounces (4 cups of flour) Can be whole wheat, white, white whole wheat
1 pound unsalted butter
1 cup brown sugar (9.1 ounces)
2 Tablespoons poppy seeds
2 teaspoons vanilla extract
- Warm the butter enough that it is pliable.
- Cream the 1 cup of brown sugar into the butter.
- Add vanilla extract and poppy seeds and cream into butter.
- Add the flour carefully to the mix and mix in.
- Gather mixture into a dough with your hands and fold a few times to ensure a good mix.
- If the dough is warm, refrigerate it a bit to stiffen it up.
- The dough becomes better after a day or two in the refrigerator.
- Roll the dough out into 1/4 inch thick sheets.
- Recipe fills 4 8×6 inch baking pans. Put sheets of dough into ungreased baking pans.
- Score the cookies into small rectangles — 1×3 inch is good.
- Perforate the cookies with a fork or pastry docker in a nice pattern.
- Score again if the scores have been pushed together.
- Bake for 40-45 minutes at 325F. (had been using 300)
- Take cookies out, cut them along the scores.
- Let cool before removing from the pan then carefully put them away.
They become better with age.
Almond Shortbread Variation
Use almond flour instead of wheat flour.
Dough is much softer than the wheat version so care is needed in rolling it out and you may need a knife or spatula to get it off the rolling space.
Cook for 1 hour.
Oatmeal Raisin Cookies
by Jay Kelly
Serves 12 large or 16-20 medium cookies
3/4 cup white sugar
3/4 cup light brown sugar (packed)
3/4 cup softened butter
2 large eggs
1 teaspoon vanilla extract
1 1/4 cup flour
1 teaspoon baking soda
1/2 teaspoon salt
3/4 teaspoon cinnamon
2 3/4 cup oats (no quick oats)
1 cup raisins
- Preheat oven to 375°F
- In a large bowl mix white & brown sugar with softened butter until creamy. (I use a potato masher when mixing these ingredients by hand as it’s less effort and stress on joints)
- Add eggs and vanilla extract to sugar & butter mixture. Mix until uniform.
- In a separate small bowl mix flour, baking soda, salt, and cinnamon. Then fold the flour mixture into the wet sugar/ butter/egg mixture until fully incorporated.
- Finally add oats & raisins and mix well.
- Spoon rounded cookie mixture onto a large ungreased cookie sheet. Press down slightly when placing on sheet, cookies will flatten & expand while baking so leave adequate spacing. (Large Tablespoons for 12 large cookies, slightly less than a tablespoon for 16-20 smaller cookies. I fit 6 large or 8-9 medium cookies to a large cookie sheet)
- Bake at 375°F on middle rack until edges are golden brown and center begins to brown. Large cookies bake for 10-12 minutes for chewy/soft cookies, add 2-3 minutes for more crispy cookies. Cookies will continue to brown slightly after removing from oven. Cool for 5 minutes and remove to wire rack. (It’s helpful to keep an eye on cookies in the last few minutes of baking to get them just how chewy or crispy you like them. Don’t be afraid to bake a single test cookie to get a feel for timing as, like bakers, each oven has its own personality.)

TeamCum Tart
by MILF ‘N’ Cookies
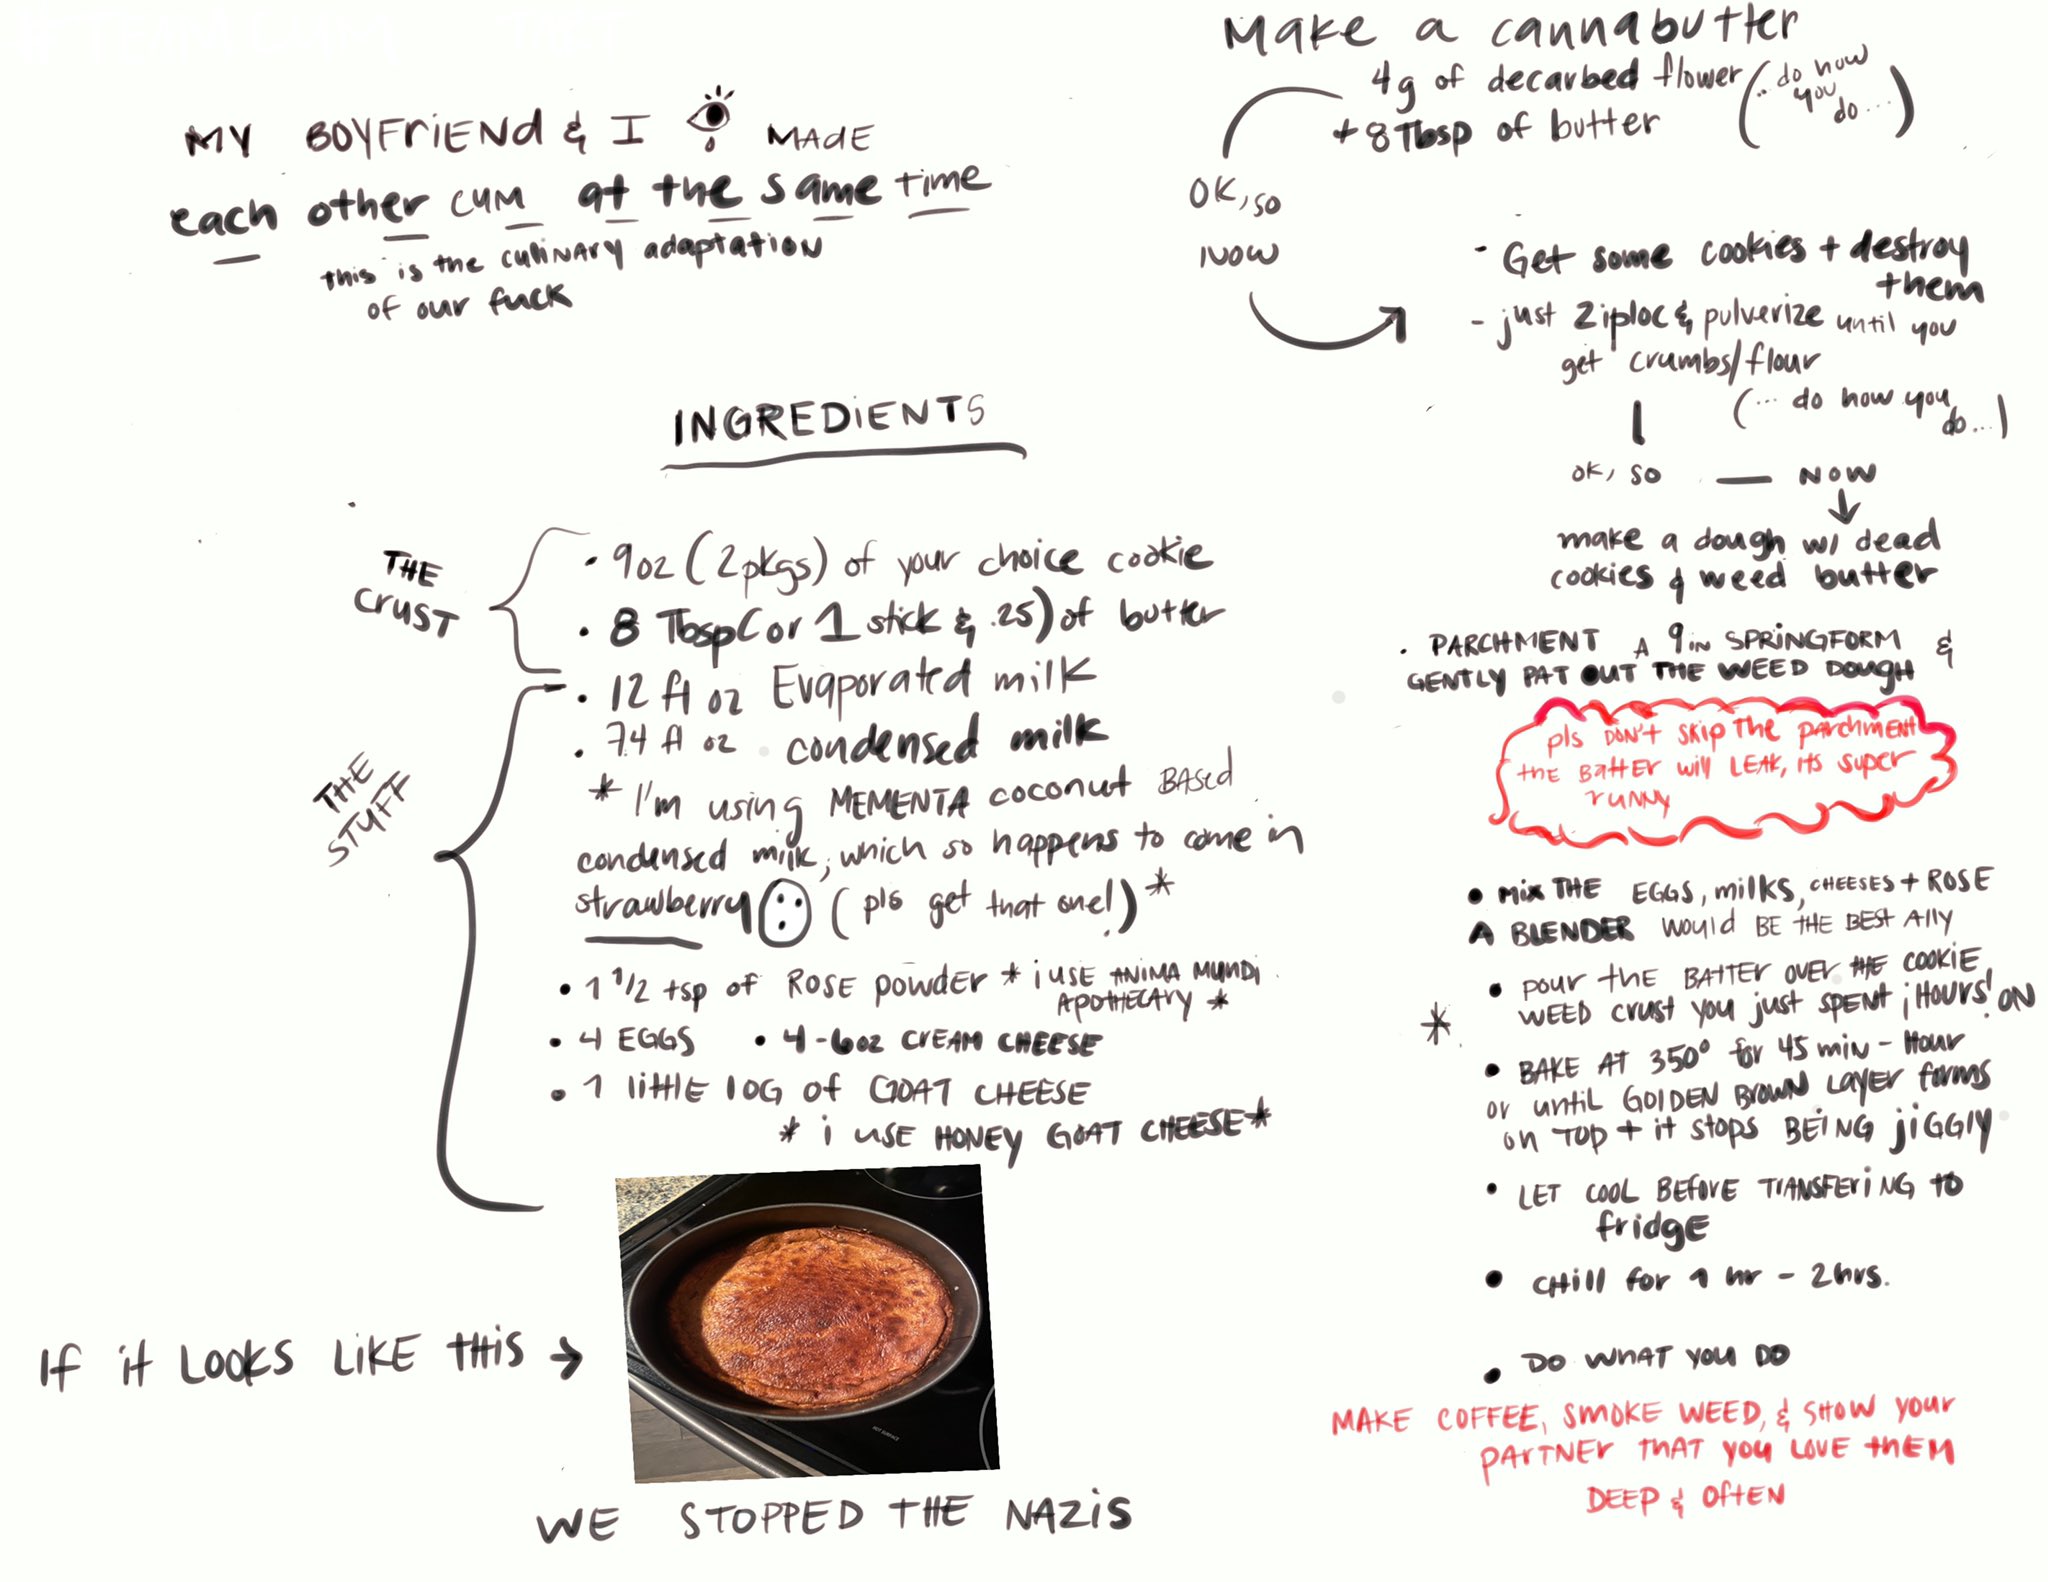
TeamCum Tart (text transcript)
My boyfriend & I (eye) made each other cum at the same time. This is the culinary adaptation of our fuck
Ingredients:
The Crust:
- 9 oz (2 packages) of your choice cookie
- 8 Tablespoons (1 stick & .25) of butter
The Stuff:
- 12 fluid ounces Evaporated Milk
- 7.4 fluid ounces condensed milk
* I’m using Mementa coconut-based condensed milk, which so happens to come in strawberry (wow face) (pls get that one * - 1 1/2 teaspoon of rose powder *I use Anima Mundi Apothecary*
- 4 eggs
- 4 – 6 ounces cream cheese
- 1 little log of goat cheese
* I use honey goat cheese*
If it looks like this (arrow pointing to a photo of a golden brown topped tart in a pie pan) we stopped the nazis
Make a cannabutter: 4 grams of decarbed flower (“do how you do…) + 8 Tablespoons of butter
Ok, so now:
- Get some cookies + destroy them
- just ziploc pulverize until you get crumbs/flour (…do how you do…)
- ok, so — now make a dough w/ dead cookies & weed butter
- parchment a 9-inch springform & gently pat out the weed dough
* pls don’t skip the parchment the batter will leak, its super runny - Mix the eggs, milk, cheeses and rose
A blender would be the best way - Pour the batter over the cookie weed crust you just spent ¡hours! on
- Bake at 350° for 45 minutes – hour or until golden brown layer forms on top and it stops being jiggly.
- Let cool before transferring to fridge.
- Chill for 1 hour – 2 hours
- Do what you do.
Make coffee, smoke weed & show your partner you love them deep & often.
About this Zine
This zine is dedicated to everyone that feeds and protects their communities, but especially to those that have gone to jail for feeding the hungry.
In “Soup For Our Families,” I wanted to evoke the kinds of micropublished cookbooks that circulated in my childhood, created by church groups, nonprofits and small towns. These spiral-bound books helped communities bond, and I hope this cookbook brings antifascists closer together.
Thanks to JM for proofreading an early draft.
I commissioned the front cover art from “Somebunny who draws.”
Cola (thecolacorporation.com) created the back cover artwork. I’m grateful for the permission to reprint it here.
Internally, I selected public domain illustrations from 19th- and early 20th-century sources, collected in pictorial archives from Dover Books.
This zine is released under a Creative Commons Attribution 4.0 International License. Do whatever you want with it, just please give everyone credit. Rest in Power, Aaron Swartz.
Find me online: kitoconnell.com / @KitOConnell
Did I leave something out or get something wrong? Send feedback to kitoswn@protonmail.com.

Released under a Creative Commons License
 Soup For Our Families: An Antifascist Cookbook by Kit O’Connell (editor) & comrades is licensed under a Creative Commons Attribution 4.0 International License.
Based on a work at https://kitoconnell.com/2021/11/30/soup-zine/.
Feel free to share and republish this, but give me credit (and a link back whenever possible).
Kit’s patrons made this post possible. One generous anonymous sponsor asks that you support Austin Pets Alive! Donate, volunteer, and consider them for pet adoptions.